On Windows:
- Click Start > Run or windows key + "r" to get a run box
- Type '\\rootsprint1' in the space provided (sometimes you may need to type rootsprint1.biossys.oregonstate.edu), then press Enter. You may be prompted to enter a username and password. If you do, use username@oregonstate.edu as your username and your ONID password. A new window should appear listing all of the printers you can choose from.
- Double click on the name of the desired printer to add. Printers are labeled by building and room number.
On Mac:
- Go to http://roots-cups.biossys.oregonstate.edu:631/printers/ and you will find a list of the available printers. Find the one you'd like to add and make note of it for step 2. If the printer you need isn’t listed, please let us know and we will try to add it.
- On your Mac go into Printers and Scanners, in System Preferences
- Click on the + sign to add a printer
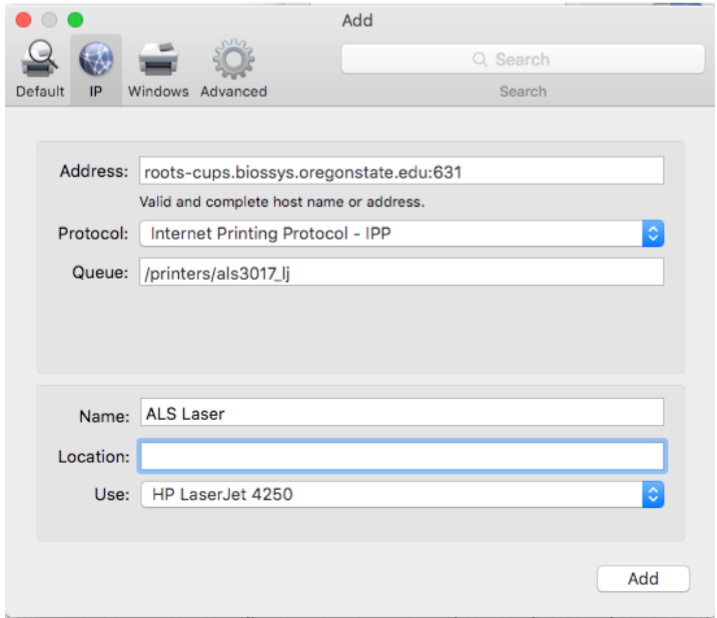
- Click on IP (in Big Sur, it is the center icon that looks like a globe)
- Enter the following:
Address: roots-cups.biossys.oregonstate.edu:631
Protocol: Internet Printing Protocol (IPP)
Queue: /printers/printername (from Step 1)
Name: give the printer a name you’ll recognize
Location: Skip
Use: Pick the correct driver. For most printers, you may have to search for the driver on the printer's website. If you are adding a Ricoh Copier, you must search for and download the driver from Ricoh directly or it will not work.
- Click on Add
Printer Codes (EMT & CSS)
If you are adding a Ricoh printer, and your department is using printer codes (EMT, CSS), you will have to enter a printer code before printing.
On Windows:
- Go to Devices and Printers and search for the Ricoh printer you've just added.
- Right click on the printer and select "Printing Preferences".
- On the second tab called "Detailed Settings" there is a middle column called Menu. The top item will be "Job Setup". Click on that and on the right side there will be a user code box for your printing code.
On Mac:
- In the print dialog, find the drop down menu that includes Job Log; select Job Log. You must have a Ricoh selected as a printer for this to show up.
- Check the box that says "Enable User Code".
- Enter your user code in the text box (your department office staff will provide you the code).
- If you never want to do this again, use the Presets drop down menu to save this as your copier preset.
If you cannot connect via RootsPrint (Windows 11 mostly)
If you cannot connect via Rootprint (some personal computers running Windows 11 may have this problem), you can connect via the Cups server:
First go to the Cups Printers page (http://roots-cups.biossys.oregonstate.edu:631/printers) and see if the printer is there.
Then:
- Go to Devices & Printers in Settings
- Click on the Add Device Button
- Select Add Manually
- Chose “Select a shared printer by name”
- Enter: http://roots-cups.biossys.oregonstate.edu:631/printers/name-of-the-printer (eg: http://roots-cups.biossys.oregonstate.edu:631/printers/als3017_ricoh)
- Choose an appropriate driver for the Ricohs. You may have to download one manually from the Ricoh website.


